Pattern Making Rulers: Square, Curve and Cutting – What Each Ruler Draws

Which pattern making ruler draws which line: L-square, curve rulers, pattern master and clear cutting ruler. Work order, seam allowance, safe rotary cutting and what to buy first.
A pattern making ruler isn't a single tool but a small set of rulers, each drawing a different type of line: an L-shaped square ruler draws straight and perpendicular lines, curve rulers draw the neckline, armhole, hip line and sleeve, and a clear grid ruler is used to mark seam allowance and to cut fabric with a rotary cutter. This guide explains which pattern ruler suits each line of the pattern, in what order to work with them, how to cut along a ruler without getting hurt, and what to buy first depending on the type of work.
Four types of lines in a pattern, and a pattern making ruler for each
Every pattern is built from four types of lines. Straight lines, such as the center front line, the grain line and a straight hem. Right angles, where a horizontal line leaves the center line. Curves that follow the shape of the body, such as the neck, armhole and hip. And lines parallel to the seam line at a fixed distance, i.e. the seam allowance.
An ordinary straight ruler only handles the first type. Angles drawn "by eye" tend to drift, and a curve drawn freehand is hard to reproduce on the other side of the pattern. That is why it is common to work with several dedicated rulers rather than look for one ruler that does everything.
Types of pattern rulers and what each one draws
L-square ruler: a metal ruler with two marked arms meeting at a 90-degree angle. You place one arm against an existing line or the edge of the fabric, and the other arm gives you an accurate perpendicular line. The L-square rulers category offers three sizes: 15×30 cm for corners, pockets and collars, 25×50 cm for basic blocks and squaring the fabric edge, and 61×40.5 cm, 5 cm wide and 2 mm thick, for drafting on a large table and squaring wide fabric.
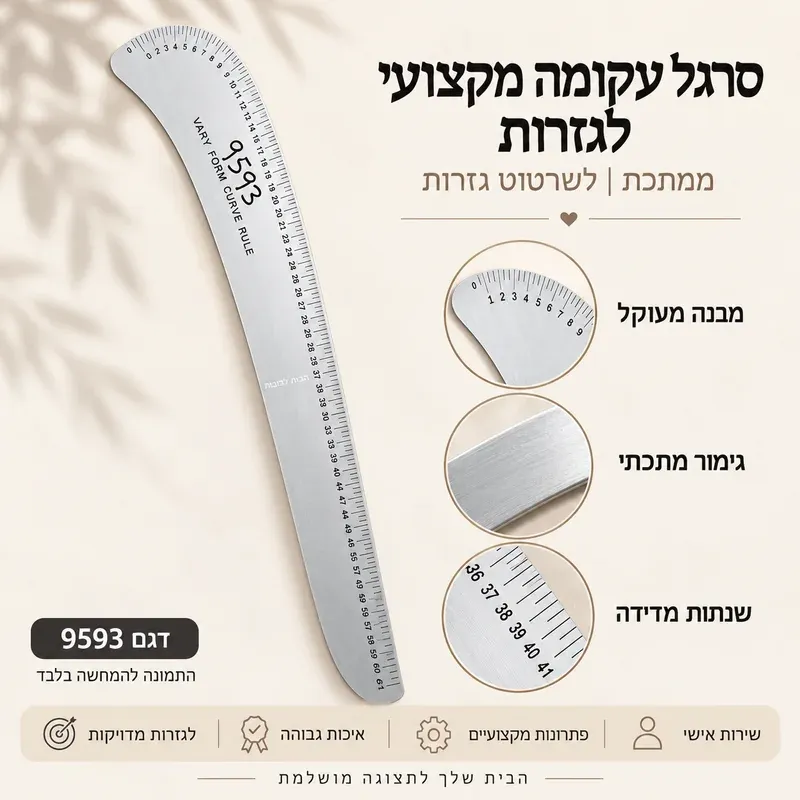
Long curve ruler: a ruler whose curve changes gradually, sharp and tight at one end and opening almost into a straight line at the other. It is used for the hip line, the side seam of skirts and trousers, a curved hem and sleeves. The metal curve ruler is marked from 0 to 61 cm along the curve, so you can also measure the length of a curved line with it. There is also a yellow plastic version with the same marking length and a hanging hole.
Pattern master ruler: a plastic ruler with a straight edge marked up to 49 cm, a front curve and a back curve for the neckline and armhole, a curve for children's patterns and a curved outer edge for the side seam and hip. Internationally it is known as the Pattern Master, and it combines the roles of a straight ruler and several curve rulers in one tool.
Clear pattern ruler with a curve: a 43×19 cm ruler with a straight edge, a curved edge, a grip handle and a pink grid of parallel lines, angle lines and seam allowance markings. Its transparency lets you see the line underneath, so it is handy for copying and adjusting existing patterns. All curved rulers are gathered in Curve rulers.
French curve: a small clear comma-shaped ruler, 29.9×12.6 cm, with pink markings and five round holes. Its short curves suit the armhole, neckline, sleeve cap and collars, and for work on small patterns it is more convenient than a large pattern master.
Clear cutting ruler: an acrylic ruler with a full grid and 30, 45 and 60-degree angle lines, in sizes 15×30, 15×25 and 10×45 cm, in the Cutting and quilting rulers category. One of the 15×30 cm models is 2.8 mm thick. In pattern making it is used to mark seam allowance and parallel lines, and in sewing and quilting as a guide rail for a rotary cutter.
Print placement ruler: a clear plastic ruler whose top edge is cut in the shape of a collar, with neck lines for adults, youth, toddlers and infants, a center line and a V-neck marking. It isn't used for pattern making but for positioning a print, HTV vinyl or embroidery on a finished shirt.
Which ruler for which line in the pattern
Center front and back line, grain line: a long straight line. The long arm of a large L-square ruler, or the straight edge of a long ruler.
Horizontal lines at bust, waist and hip level: an L-square ruler, so they come out perpendicular to the center line.
Neckline and armhole: the short, deep curves of the pattern master, or the curved part of the clear pattern ruler.
Side seam from waist to hip, inseam of trousers, curved hem: a long curve ruler.
Sleeve cap: the curved edge of the clear pattern ruler or a curve ruler, depending on the depth of the curve.
Seam allowance and parallel lines: a ruler with a clear grid.
Smoothing lines after grading up, grading down or altering a pattern: a long curve ruler or a pattern master.
The work order: from drafting the pattern to cutting
Base lines. Draw a straight center line, and with the L-square ruler draw perpendicular lines from it at bust, waist and hip level. Mark the measurements on these lines.
Points before curves. Mark at least three points on each curve and find the part of the ruler that passes through all of them. Draw a long curve in sections, moving the ruler along the line so each section continues the previous one.
Pencil first. Draft in pencil, and only after checking confirm the line in pen or chalk.
Truing the lines. Place the front and back pieces side by side at the shoulder seam and the side seam, and check that the neckline and armhole continue in a smooth flow without breaking into an angle where they meet. Also check that two edges that will be joined in a seam are the same length. A marked curve ruler makes comparing curves easier.
Seam allowance. Only after the seam line is trued do you draw the seam allowance parallel to it. A correction made after the seam allowance has already been added means redrawing it.
Cutting. Cut the pattern out of the paper, lay it on the fabric along the grain line, and cut with scissors or with a rotary cutter along a ruler.
Adding seam allowance with a grid ruler
On a straight line the work is simple: place the grid line that matches the seam allowance width exactly on the seam line, and draw along the edge of the ruler. This gives you a line parallel along its entire length without measuring point by point.
On a curve, the straight edge can't follow the line. Move it along the curve, mark a point at the seam allowance width at short intervals, and finally connect the points with a curve ruler. The deeper the curve, as in the armhole, the closer together the points should be. A sharpened pencil held tight against the edge of the ruler keeps the width even.
Cutting with a rotary cutter along a ruler: safety rules
A rotary cutter is fast and precise, but the blade is completely exposed. Most injuries happen when the hand holding the ruler is too close to the edge, or when you reach across the ruler. These are the rules published by cutter manufacturers and quilting shops:
Always cut on a dedicated cutting mat, after clearing it of pins and fabric scraps.
The hand holding the ruler lies flat on it and presses down, with the fingers away from the edge the blade runs along. A wide ruler lets you keep them further away.
Always cut away from your body, never toward it.
Don't reach across the ruler to cut on the other side. Move the fabric or walk around to the other side of the table.
Close the blade after every cut, and never put down a cutter with an open blade on the table.
Cut standing, at a table height that lets you look down on the ruler lines from above.
Replace a dull blade. A dull blade requires more force and repeated passes, and that is where the hand tends to slip.
For cutting long strips, the narrow 10×45 cm ruler is convenient: it covers a long length in one placement and reduces the need to move the ruler in the middle of a cut.
Print placement ruler: how to use it
Place the cut edge snugly against the collar seam, align the neck line that matches the shirt size, and read on the grid how far below the collar and how far from the center line the print sits. The grid is marked in inches, numbered 1 to 7 on each side of the center line and along the height. In placement guides from shirt print shops, it is common to start a center chest print about 2 to 3 inches below the collar. The advantage for batch work: exactly the same measurement on every shirt, before heat pressing or before embroidery.
What to buy first, by type of work
Fashion students and pattern makers: a 25×50 or 61×40.5 cm L-square ruler, a pattern master and a long curve ruler. The three cover straight lines, angles, neckline, armhole, side seam and hip.
Dressmakers who copy and adjust patterns: a clear pattern ruler with a curve, which combines a straight edge, a curve and a seam allowance grid, along with a 15×30 cm L-square ruler for corners and pockets.
Quilting and strip cutting: a 15×30 cm cutting ruler for general work, and a 10×45 cm ruler for long strips. A 15×25 cm ruler fits into a sewing bag for workshops.
Printing and embroidery on shirts: a print placement ruler, together with a straight ruler for checking the print width.
All types can be seen in the Rulers category, and at the showroom at Kfar Giladi 15 in Tel Aviv. Fashion schools, studios and classes buying in quantity can get a wholesale quote by phone at 03-9444226 or on WhatsApp at 055-2473993.
Frequently asked questions
What is a pattern-making ruler?
A pattern-making ruler is a drafting tool for constructing garment patterns on paper, not just for measuring. Unlike an ordinary straight ruler, it has a right angle, curves or a grid, so you can draw perpendicular lines, necklines, armholes, hip lines and seam allowances. You usually work with a combination of an L-square, a curve ruler and a clear grid ruler.
What is a Pattern Master?
Pattern Master is the internationally accepted name for a triangular pattern-drafting ruler. It combines a marked straight edge, short curves for the neckline and armhole, and a long curved edge for the side seam and hip line. On the model sold on our site, the straight edge is marked up to 49 cm, and it also has a dedicated curve for children's patterns.
Can you draft a pattern with just one straight ruler?
You can draw the straight lines with it, but right angles and curves come out less accurate. A curve drawn freehand is hard to reproduce on the other side of the pattern or on the next pattern. That's why pattern-making guides recommend starting with at least a long straight ruler, an L-square and a curve ruler.
Which writing tool do you use to draw along a pattern-making ruler?
On pattern paper, draw in pencil first so you can erase and correct, and only after checking confirm the line in pen. On fabric, mark with tailor's chalk or a fabric marking pen. A sharpened pencil held tight against the edge of the ruler gives a more accurate line.
How do you check that the neckline and armhole flow between the front and back pieces?
Lay the two pieces side by side with the shoulder seams aligned and check the neckline, then match them at the side seam and check the armhole. The line should continue in a smooth curve from piece to piece, with no break or angle where they meet. If there is a break, smooth it with a curve ruler and transfer the correction to both pieces.
When do you add seam allowance: before or after correcting the lines?
After. First correct the seam line itself, making sure the curves flow and that edges that join are equal in length, and only then draw the seam allowance parallel to the corrected line. A correction made after adding the seam allowance means redrawing it.
Is a clear cutting ruler also suitable for drafting patterns on paper?
Yes. The full grid lets you draw parallel lines and seam allowances without measuring at every point again, and the 45-degree line helps you mark a bias line. It doesn't replace a long L-square or a curve ruler, because it is relatively short and has no curves.
What is the difference between a clear pattern ruler with a curve and a long curve ruler?
The clear pattern ruler, 43×19 cm, combines a straight edge, a curved edge and a grid, and is handy for necklines, armholes, sleeve caps and seam allowances. A long curve ruler, marked up to 61 cm, gives a long, gradual curve for hip lines, side seams and hems. Anyone drafting patterns from scratch usually uses both.
How do you center a print on the front of a T-shirt?
Find the center line by folding the shirt lengthwise or with a print placement ruler. Place the ruler's cut-out edge against the collar seam, align the center line and measure downward. In shirt printers' placement guides, a centered chest print usually starts about 2 to 3 inches below the collar.
Why should you never cross over the ruler with your hand when cutting with a rotary cutter?
When your hand passes over the ruler to cut on the other side, it enters the blade's path, and the blade can injure your fingers or arm. Instead, move the fabric or walk to the other side of the table. Always cut away from your body and close the blade after every cut.